Quantcast
Channel: Nagios Labs » Windows

Monitoring Remote Windows Machines Passively

$
0
0

Many of our clients are Managed Service Providers (MSPs).  The challenges they face when monitoring their clients’ networks vary greatly, but a common problem they face is how to monitor remote Windows machines that are located behind a firewall.

A simple solution to this challenge involves configuring the NSClient++ agent to act as a passive agent which reports it status to Nagios.  We’ve written a document that describes the steps needed to configure passive monitoring of Windows boxes.

Read how to do it:  Using NSClient For Passive Checks.pdf


Deploy NSClient++ Agent using Microsoft’s SCCM with Nagios

$
0
0

Large scale monitoring of Windows desktop/server environment made easy using Nagios XI, NSClient++ and Microsoft SCCM.

SCCM NSClient++ package

NSClient++ SCCM Package

NSClient++ Agent install pending


New documentation and video demo is available to assist some of our larger Windows desktop/server installations. Using Microsoft SCCM, we demo how you can push NSClient++ agent silently, and in the background, to sites as large as 100,000 client machines.

NSClient++ is an excellent resource for monitoring many aspects of a windows installation, including the ability run custom scripts. Mass deploying NSClient++ agent has never been easier using Microsoft’s SCCM.


Find out how:

http://assets.nagios.com/downloads/nagiosxi/docs/Mass_Deploy_NSClient_Plus_Plus.pdf

http://library.nagios.com/training/selfpaced/videos/507-nsclient-plus-plus-agent-mass-deployment-with-sccm-1of2

http://library.nagios.com/training/selfpaced/videos/508-nsclient-plus-plus-agent-mass-deployment-with-sccm-2of2

Using FTP in Nagios to deploy NSClient++

$
0
0

Many customers showed interest in deploying NSClient++ to multiple machines across a windows domain, without the need to log in remotely or be physically present on these machines.

If you are using Nagios to monitor a windows environment, you can use FTP as a component to deploying NSClient++. We just posted a document on the Nagios Library, which explains how to configure FTP for Nagios. You can review it here.

Additional information on deploying NSClient++ via FTP in Nagios will be available soon.

New NRDS Config Manager Released

$
0
0

The Latest version of the NRDS Config Manager (version 1.3) is now available!

NRDS Config Manager allows you to centrally define configuration files and plugins for monitoring agents. This centralized configuration tool makes the configuration of monitoring agents easy and flexible.

The latest version contains major bug fixes to both NRDS_Win and NRDS_Lin agents. There are also a number of new enhancements, including improved SSL support, an extension handler for common script types, and the ability to build your NRDS_Win installer files on the fly.

NRDS_Win installer

Documentation on latest NRDS_Win capabilities can be viewed at:
http://assets.nagios.com/downloads/nagiosxi/docs/Passive_Monitoring_with_NRDS_Win.pdf

To install the latest version, simply go to the “Admin” menu of Nagios XI and Choose “Manage Components”. Lastly choose “Check for updates” and you will be notified of the latest updates for all components!

NRPE 2.15 Released – Now with IPv6 Support

$
0
0

NRPE 2.15 was released earlier today. The primary update in this version of NRPE is full support for IPv6.

The NRPE daemon now has the ability to listen on IPv4 and/or IPv6 addresses. In addition, the check_nrpe plugin now accepts switches that specify whether an IPv4 or IPv6 connection should be made to the NRPE daemon. The NRPE daemon has always had the ability to perform checks using IPv6, assuming the plugin it runs supports it. Thanks to Leo Baltus for the patch that made this possible.

IPv6 communication has been tested on Linux (RHEL/CentOS) and is known to work there. It also known to compile on other Unices that we have access to: Solaris 10, AIX 5.3 and 6.1 and HP-UX 11i v1. Feedback on these and other platforms is welcome. Bugs or enhancements (preferably with patches) can be submitted to http://tracker.nagios.org. Other discussion/questions can be sent to the mailing lists or http://support.nagios.com/forum.

Major Improvements to Agent-Based Monitoring with the Release of Nagios Cross-Platform Agent — NCPA

$
0
0

Major improvements to agent-based monitoring have been taking place at Nagios Enterprises. NCPA, the Nagios Cross-Platform Agent, is a project that has the potential to revolutionize agent-based monitoring and increase the efficiency of IT support teams world-wide.

As many Nagios users know, monitoring with agents means juggling the installation of many different types of plugins to try and match devices, operating systems, and the basic functions of each agent. For example, in a simple agent-based Linux and Windows server environment you have to install 2 agents, know the 2 user manuals, there are 2 times the troubleshooting hours required, 2 times the commands on remote systems, 2 change logs to sift through for potential update breaks…the list goes on. It can be very difficult to keep organized and take a lot of time to implement and update your configuration, especially when your monitoring environment becomes larger and more complex.

Whether your environment is large or small, there are usually a myriad of devices that need to be monitored and more often than not, some sort of agent needs to be installed on these devices.

Wouldn’t it be simple if you only had to install one agent regardless of operating system or device?

We have been working on a project that aims to do this. Nagios Cross-Platform Agent (NCPA) is a fully contained agent that runs on Mac OS X, Windows, and Linux and seeks to solve all of the previously mentioned pitfalls of agent based monitoring with Nagios. The main goal of NCPA was to monitor the core metrics of a server and other devices without the added hassle of plugins and dependencies. Metrics such as CPU Usage, Disk Usage, Memory Usage, Interface Usage, Swap Usage, User Count, etc. are preloaded in NCPA so that all you have to do is install the agent. It has since broadened in scope to be a general purpose agent that is very good at doing the aforementioned job. Just install the NCPA agent on your system, and away you go.

Features & Benefits of NCPA:

-Installs on multiple platforms : Windows, Linux, Mac OS X and FreeBSD (untested on AIX, HPUX and Solaris)
-Real-time performance graphs and GUI configuration
-Fully contained agent, including dependencies
-Identical cross-platform configuration editing for both active and passive agents
-Minimizes knowledge needed to know down to one
-Advanced visual data representation

Direct links to the NCPA .exe and .rpm files can be found in the installation instructions which can be downloaded at the link below: Installing NCPA.pdf

We are very excited about this new agent and are currently looking for real world testers to try it out. To test NCPA please contact nscott@nagios.com. Thanks!

Monitoring a Windows Machine with Nagios XI & NCPA

$
0
0

We have recently developed a cross-platform monitoring agent called NCPA that is designed to simplify the monitoring of devices with a wide variety of operating systems. NCPA can be used as a passive or active agent and monitors a multitude of different metrics right out of the box. In this article I will show you how easy it is to monitor a Windows machine with Nagios XI and NCPA. To do this, simply follow these 3 easy steps:

Step 1 – Installing and configuring NCPA on the remote box.

The NCPA installer can be downloaded here: NCPA’s Installer Direct Download. Instructions on installing NCPA can be found here: NCPA Installations Instructions. Download it on the Windows machine that you want to monitor and run the installer.

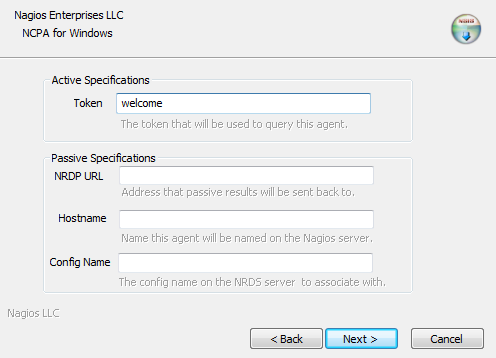
In this example, we will be using NCPA as an active agent.  This is the quickest and easiest way to begin monitoring with NCPA.  The image below is what the installation GUI looks like on the Windows device that you’re monitoring.  To use NCPA as an active agent, all you have to do is enter a token.  This token will be used to authenticate the connection between the Nagios XI server and the monitored device later in the article, so it’s important to choose a token you will remember. For this example, we entered “welcome“.  Click Next to finish the installation.

NCPA Installation Instructions

Step 2 - Testing your installation

Open a browser, type in the address bar:

https://<remote box ip address>:5693

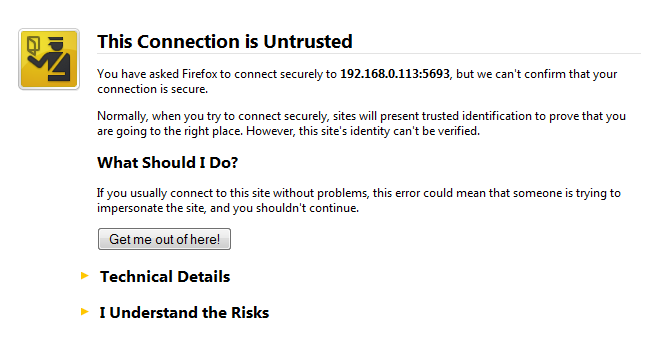
This is the address for the NCPA agent.  After attempting the connection you will get a “This Connection is Untrusted” message.

NCPA Untrusted Connection

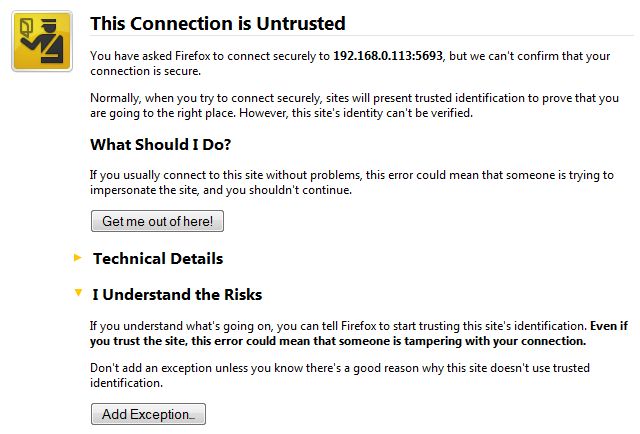
You will need to add a security exception in order to log in.

Security Exception

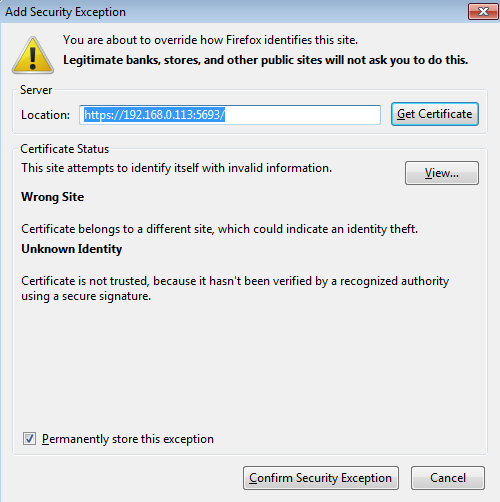
To add the the exception, click Add Exception… then enter the URL to the NCPA agent.

Add Security Exception

Once you’ve added the security exception, you should see the following login screen.  This is where you will need to enter the token for the remote machine.  In this example we used welcome“.

NCPA Login Screen

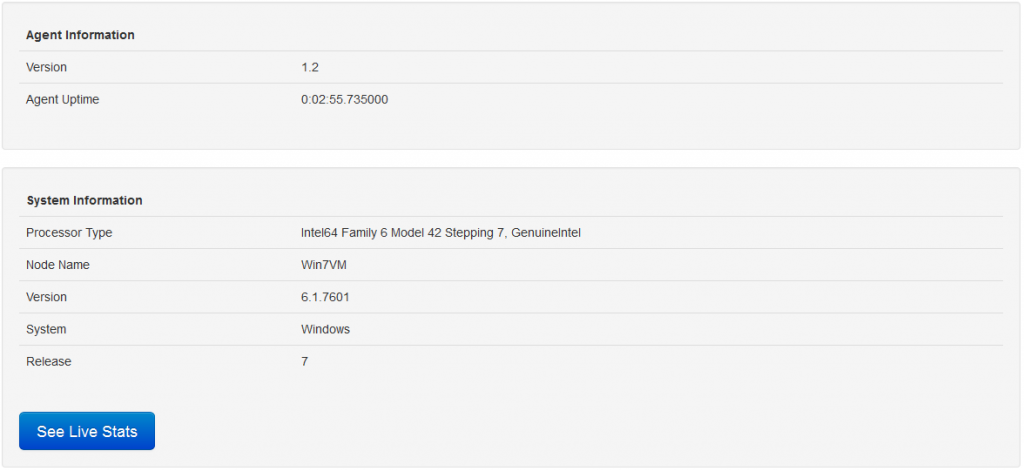
Once you log in, you will see a page similar to this one that shows the following agent information:

NCPA Agent Information

You can then click on See Live Stats to see the metrics on the Windows box. Each graph show in this view is a metric that can be monitored by Nagios XI.

NCPA Service Stats

Step 3 - Running the NCPA wizard on the Nagios XI box

From the Nagios XI web interface, go to:  Configure –> Run the Monitoring Wizard --> NCPA Agent.

NCPA Monitoring Wizard Icon

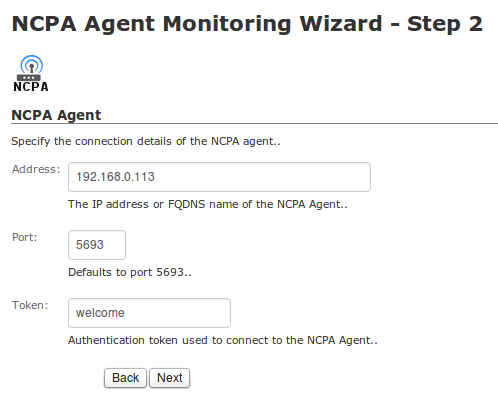
We’re using NCPA as an active agent, so all we have to enter in step 2 of the Wizard is the IP address of the remote Windows machine and the token we entered.

The last step of the wizard asks you which services you wish to monitor.  Click Apply and wait for Nagios XI to schedule the checks.  Once the checks are received, you’ll be able to view them in the Service Status dashboard.  The screenshot below shows successful checks from NCPA.


Successful NCPA Checks

NCPA is a powerhouse agent and has many other use case scenarios.  Now you have the knowledge to monitor your Windows machines with this flexible agent and Nagios XI.

Happy Monitoring!

How to Passively Monitor Windows Machines with NRDS & Nagios XI

$
0
0

In my previous article, I demonstrated how easy it is to passively monitor Linux machines with Nagios Remote Data Sender (NRDS) and Nagios XI. In today’s article, I will cover passive monitoring of Windows machines via NRDS.

Monitoring Windows machines via NRDS is no different than monitoring Linux boxes. You need to follow the same three steps:

  1. Adding Configuration
  2. Client Installation
  3. Configuring the host and its services

Step 1 – Adding Configuration

Go to Admin -> Monitoring Config -> NRDS Config Manager, click on Create Config, select Windows (32- or 64-bit) from the Operating System drop-down menu, and click on the Next button. You will see the Edit NRDS Config page. Most of the config options will already be populated for you with the default options. All you will need to do is type a config name, select a token from the drop-down menu, and click on the Apply button. For this example, we will be creating a config called “Win7x64”.

Edit NRDS Config

For more information on editing configuration files in NRDS, please watch the video below:

Watch this video on YouTube.

Step 2 – Client Installation

Now we must install the client. Go back to the NRDS Config Manager (Admin -> Monitoring Config -> NRDS Config Manager). You will see the new configuration file that you just created (in this case it is called “Win7x64″).

NRDS Config Manager

Click on the Client Install Instructions button (the “Notepad” icon). You will be presented with a download link to the executable, that you need to run on the Windows client.

Save the executable on the client and double-click on it to run the installer.

NRDS Client Installation

A new scheduled task will be created if you selected the “Create Scheduled Task” checkbox during the client installation. The task will run on a time interval that you specified. As you can see above, I selected a time interval of 5 minutes. You can view the tasks in the Windows Task Scheduler:

Windows Task Scheduler

Step 3 – Configure The Host And Its Services

The last step is to configure the host and its services. From the Nagios XI web interface, click on Admin -> Monitoring Config -> Unconfigured Objects.

Select the checkbox next to the host, and click on the Configure button (the blue triangle).

Unconfigured Objects

Click on the Next button to proceed and complete the Unconfigured Passive Object Monitoring Wizard.

You have now successfully configured a Windows host for passive monitoring with NRDS in Nagios XI.  The checks can now be viewed in the Service Status Dashboard.

Service Status Dashboard

For more information about passive monitoring with Nagios XI and NRDS view this document:
Passive Monitoring with NRDS and Nagios XI

You may also watch the NRDS video tutorial here:
Nagios Remote Data Sender Tutorial

If you’re new to Nagios XI, download the fully functional Free 60 Day Trial to get started!

Don’t forget, Nagios World Conference 2014 is taking place this October! Register here to save $100 off your conference pass!

Come See Ludmil Miltchev present at Nagios World Conference 2014
Happy Monitoring!